How To: Take Control Over Your MacBook's Fans for a Cooler, Smoother-Running Laptop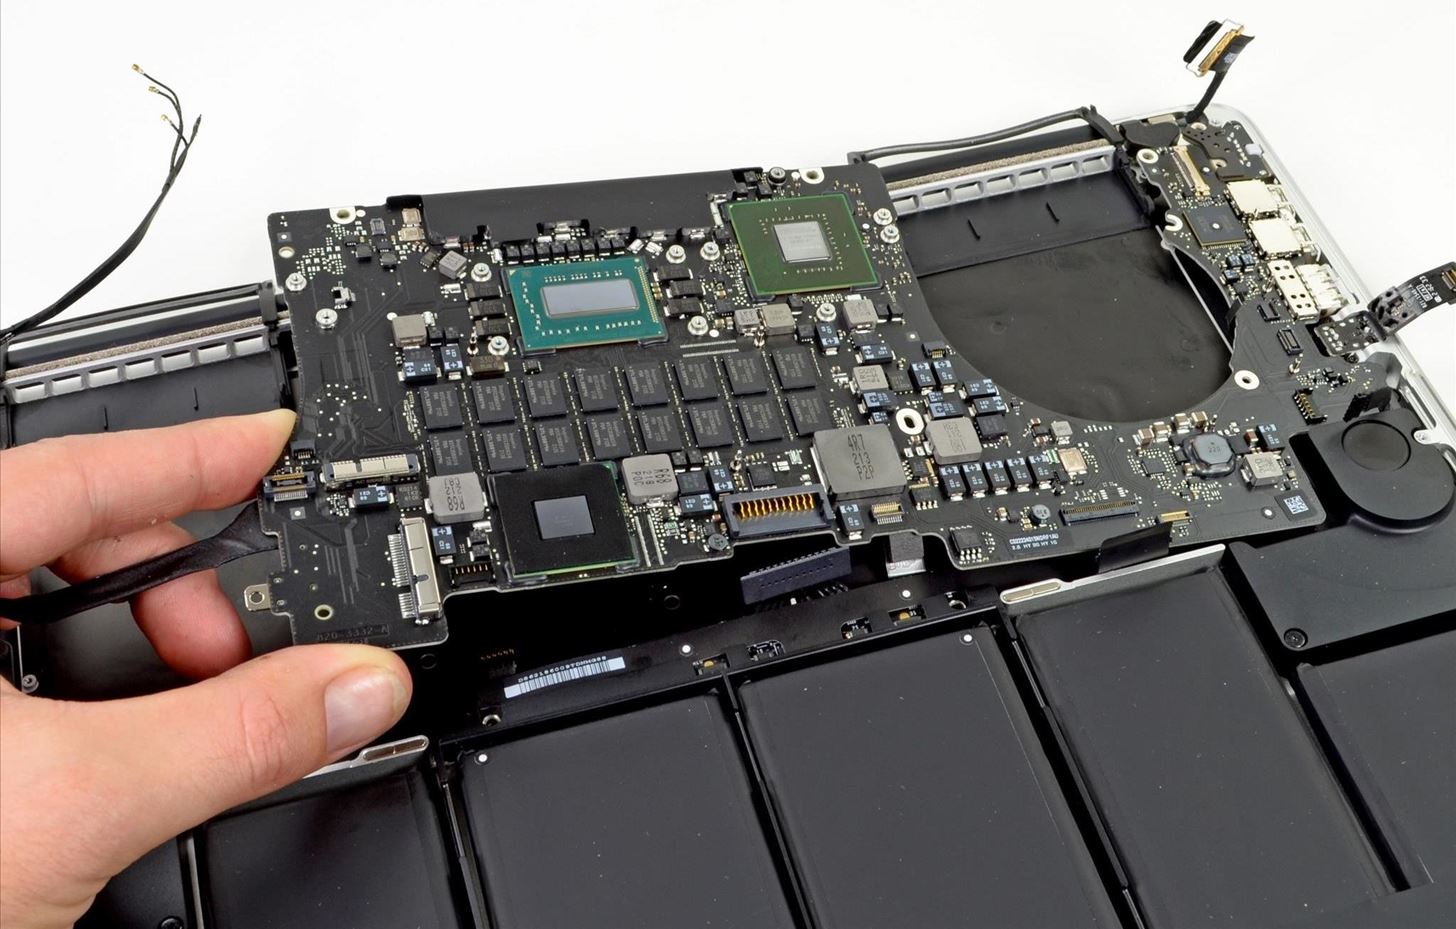
MacBooks are built for creation and creativity. They're built to withstand our careers, our hobbies, and our everyday use. I use mine every day, and there's nothing I'd recommend more for computing needs.However, not all MacBooks are built the same. The newer MacBooks models (2012 to 2014) have a logic board (aka motherboard) design that makes the fans inside the system virtually silent. While this is a great improvement, it can also have some setbacks (as with everything in life). Image by Walter Galan/iFixit The system can get very hot on the bottom, which can get uncomfortable for many people. Not to say this doesn't happen with the other models, or laptops in general, but this happens naturally with the newer MacBooks.There is a way you can control your fan's speed and power to prevent this from happening, and it's completely safe (if used properly), and easy to do. So, let's get to it.
Macs Fan Control by CrystalIDEA SoftwareMacs Fan Control is one of many fan controlling programs for Mac (like smcfancontrol and Fan Control 1.2), but this is one of the more stable and user-friendly applications out of the bunch.
Step 1: Installing Macs Fan ControlFirst, head to CrystalIDEA Software's website to download Macs Fan Control onto your computer. Make sure to choose the "Macs Fan Control for Mac OS X" download, not the "Boot Camp" one. Once download, unzip the file and move the app to your Applications folder.
Step 2: Setting Up Your Fan ControlDouble-click on the application to open it, and immediately, you'll see its icon appear simultaneously in your Mac's menu bar on the right. The options available in the menu bar shortcut include the following.Show Macs Fan Control will take you to the program, if you have it hidden in the menu bar. Website and Check for updates is pretty self-explanatory. Left/Right side - Auto will allow you to change the fan speed, which learn about later. Preferences shows advanced controls that we won't be needing, though you may want to change your temperature stats from Celsius to Fahrenheit here, depending on which you're used to. Exit will exit out of the program entirely.
Step 3: Understanding the Mac Fans Control UIThis program's main window has all the information you need to understand what you're going to do, and what your limits are.
Fans Information (Left Side)The left side of the window is your fan Information. Min RPM is as slow and powerless as your fan should go. Current RPM is the speed your fan is currently running at. Max RPM is the highest possible speed your fan can go. You don't ever want to go to that speed or near it. Control is the way that fan is being controlled. By default, it's going to be running on Auto, which means the fans have complete control of their speed at all times. This is what we can change to allow our fans to work harder and cool down our system.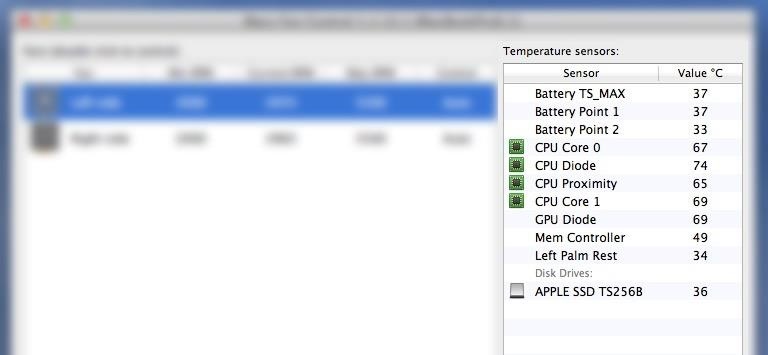
Temperature Sensors (Right Side)The right side of the window shows the temperature of all the parts of your system. Sensor shows the sensors in your system which are on various parts. Value shows the temperature of this sensor. The default scale is Celsius, though, as I mentioned before, you can change this in the app's preferences. Just glancing at the fans and sensors information will give you a good idea of whether or not something is heating up a little too much.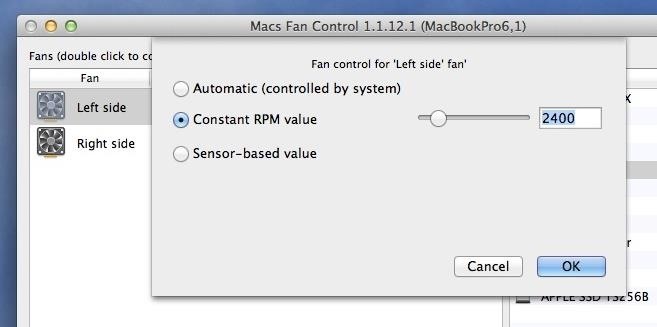
Step 4: Tweaking Your Fans' SpeedNow that we understand the information given to us, let's see how we can tweak it. Go to the left side of the window and double-click on the fan you want to affect. In this example, I'll change the left fan, but you should change both fans to the same speed when doing this procedure. You will be presented with your options when you double-click a fan. The default is Automatic, but to change your fan's speed, you'll want to select Constant RPM value instead. You can either use the slider, or type your own custom speed.Remember, do not go near your max RPM for the fan—pick a healthy RPM that isn't too high. Usually about 200 to 1000 RPMs above your current is as much as you should consider—I changed mine to 2400. Once you're done selecting your speed, click on OK.You'll see that your value will begin to increase to the value you just set. And, your Control will no longer be on Auto, it will change to the constant value you chose. Your Mac will be begin cooling if you selected the right temperature. You will be able to hear the fan at higher rates, but it won't be doing any harm to your system. Remember to change your other fan to the same speed, so they're running evenly.
Warning: Do Not Leave Your Fans on 24/7Do not leave your Mac running with this fan speed longer than the time you're using it. It will not cause damage for time-to-time use, but you do not want this to be a 24/7 operation. It would be best to use software like this to cool your system down while it's hot, and then reset to normal values.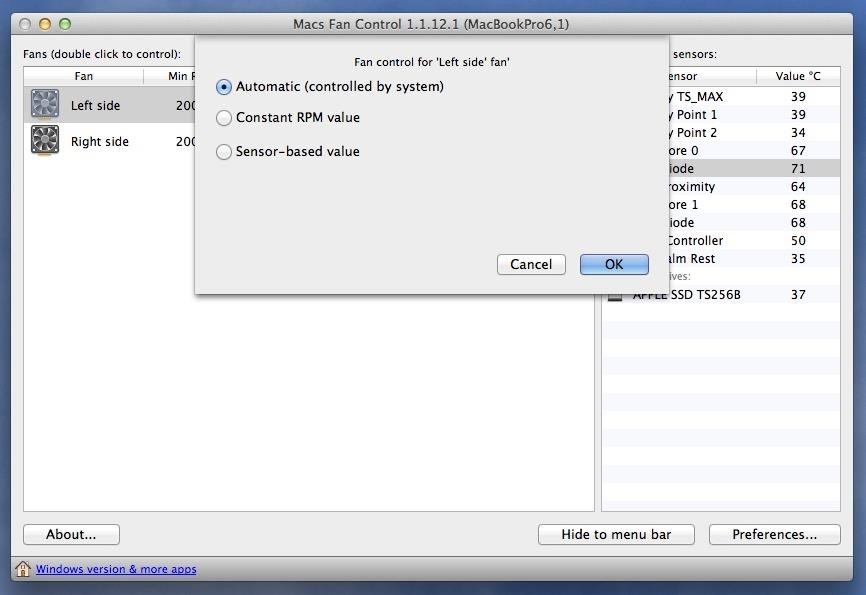
Step 5: Return to Original SettingsOnce you've solved your heating problem, it's time to return to the original settings to prevent the fans from staying at the speed that we set. Go back to the same fan(s) you selected before, and double-click it again. This time, select the first option, Automatic (controlled by system), to go back to normal.
That's It: Enjoy a Cooler MacBookNow you don't need to worry about your laptop burning your legs when you start to use it heavily. Did this trick cool down your laptop? Let us know in the comments, along with what settings worked best for you.
Cover image via Brett Hartt/iFixit
How can I use my vibrant as a modem? HowardForums is a discussion board dedicated to mobile phones with over 1,000,000 members and growing! For your convenience HowardForums is divided into 7 main sections; marketplace, phone manufacturers, carriers, smartphones/PDAs, general phone discussion, buy sell trade and general discussions.
Samsung Vibrant Review - Android Smartphone Reviews by Mobile
As you can see, there are a number of reasons to try out this DIY WiFi antenna, or a cantenna, also known as a tin can WiFi antenna. Tin Can DIY WiFi Antenna (Cantenna) This is so frugal it may just put Belkin out of business if we all made one of these bad boys! Use an old tin can from dinner and have the range you need for less than a meal at
How to Make a Long Range Wireless Antenna | It Still Works
Learn how to capture, edit, and share videos using Adobe Premiere Rush on your iOS device. All of your projects and latest edits are synced to the cloud, so any changes made on your iOS devices are automatically synced to Adobe Premiere Rush on your desktop.
Video Creation & Editing App for iOS, Android | Adobe
Samsung has, in a way killed, the DeX dock with the launch of the Galaxy Note 9. With the new Galaxy Note 9, you no longer need a DeX dock separately to convert it into a PC. The DeX is integrated in the phone itself. All you need to do is just buy any USB Type-C to HDMI adapter to connect the Galaxy Note 9 to a monitor.
How to Connect Your Galaxy Note 8 To Your TV - YouTube Tech Guy
If you want an excellent smartphone camera, get an iPhone XS or iPhone XR, Google Pixel 3, Samsung Galaxy S10, or a Huawei P30 Pro. But whatever you do, don't get the Nokia 9 PureView. The Nokia 9
News: The New Nokia 6.1 Is a Solid Upgrade to One of Last
I've changed the default program for a file opening directly off the PC, but this isn't working for the downloads. This is driving my partner crazy. If I'm home I'll save the file, then find it and open it with Word, but it's really ridiculous to have to go through this rigamarole, and it's becoming a frequent source of conflict. Help!
Romy and Michele definitely didn't invent post-its, and you definitely don't have a hobby, so take a look to find your *thing*.
Résumé Hack: Use a Word Cloud to Find the Most Important
Android 4.0 has not been released for the Nexus One, but you can still install with a tutorial we will be covering later on. For now, let's take a look at how you can get HTC Sense 3.5 (from HTC Desire, HTC Sensation etc.) with Android 2.3.5 on your Nexus One. Disclaimer: We are not to be held responsible if you damage or brick your device
How to Install HTC's BlinkFeed Launcher on Any Android Device
Note* If it didnt work on the first few tries, take out your S-Pen and try it again. You also have to do it really quick. Sliding the battery out and in again instead of taking the whole thing out
How to change the screen timeout duration on my Samsung Galaxy S4
Smart Drawer automatically organize you apps for you, working on top of any launcher. Download Smart Drawer, move its icon on your home screen and that's it. You won't have to move your apps in folders, everything will be automatically done for you. - Enjoy the automatic app sorting - Customize your drawer
Smart Drawer - Apps Organizer Latest Version 1.0.1 Apk
Dec 11, 2017 · A lot of us must be wondering if we're hooked on our tech: Searches for "phone addiction" have risen steadily in the past five years, according to Google Trends, and "social media addiction
Vyměňte svůj Samsung Emoji za další populární sady ikon Google a iOS Ikony Emoji se mohou značně lišit od výrobce k výrobci. Obvykle se nejedná o problém, pokud všichni vaši přátelé nepoužívají iPhone a vy jste jediný, kdo obdrží jinou ikonu než zbytek vaší skupiny.
Remove the headphones and connect them again. Both speakers and headphones will start appearing as separate devices in the Volume Mixer. You can now manage their volumes independently. Windows will remember the level for each one and when you connect the headphones, it will automatically adjust the volume to the last set for the device.
VolumePanel lets you set individual volume levels for each app
0 comments:
Post a Comment