How To: Take a Screenshot on Your Samsung Galaxy Gear Smartwatch
No offense to T-Mobile, but if you head over to their support page for the Samsung Galaxy Gear, you get the information below on how to take a screenshot of your smartwatch. Oh, thank you for that.Unlike pretty much any smartphone or tablet, Samsung decided to leave out the screenshot option for the Galaxy Gear, probably because they don't expect many users to take screengrabs of their watches.Still, there will come a time when you'll want to take a screenshot, and in this softModder guide, I'm going to show you exactly how it's done using a Windows PC. It's not as easy as just touching a few buttons at the same time, but once you get the hang of it, it's a fairly simple process.
Step 1: Download the Android SDKIn order to get the appropriate screenshot tools, you'll need to download the Android SDK, a provision of developmental tools made for the Android software. Image via wonderhowto.com We previously downloaded this to get Candy Crush Saga working on the watch.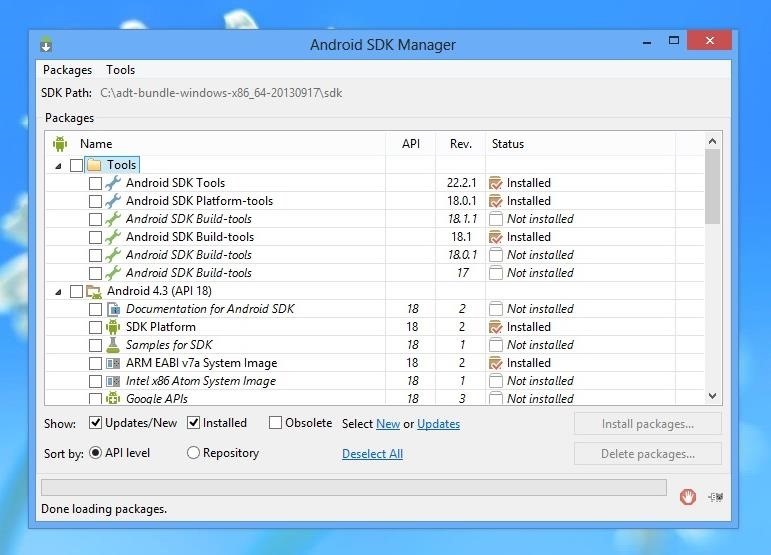
Step 2: Install SDK & PackagesAfter you've downloaded the SDK, you'll get a folder called adt-bundle, which will contain SDK Manager. Install it on your computer and open it up. If it has any packages for you to install (lower right in the screenshot below), make sure to do that by clicking on Install packages....
Step 3: Open Dalvick Debug ManagerOnce this is done, head back to the adt-bundle folder, but this time double-click on the sdk folder. Then on the tools folder. And finally on the ddms file. This will open up a command prompt window. Wait patiently while your file loads. After a few seconds, Dalvick Debug Manager will open.
Step 4: Connect Gear to PC & Take ScreenshotsNow that Dalvik Debug Monitor is on, make sure that your Samsung Galaxy Gear has "USB debug" checked (Settings -> Gear info -> USB debug). Once this is done, place the Gear in its charging dock and connect it to your computer via USB. You should see it appear under Name on the Dalvik Debug Monitor application. Click on your device so that it is highlighted blue. Now click on Device and at the top of the progam and then Screen Capture... (or press Ctrl-S as a shortcut). From there, a small popup will appear showing you your device's current screen. Whatever screen you want to capture, you'll have to change it on your Gear and then press Refresh. You can then rotate the picture, copy it, or save it onto your computer. And that's all there is to it. Not quite as easy as taking a screenshot on your Samsung Galaxy Note 3, but it's all we've got right now.
The iPod touch fourth generation and later models should work with most Bluetooth headsets, but earlier iPod Touch models do not support one of the most common Bluetooth headset profiles. A
Which Bluetooth Devices Work With an iPod Touch - It
Phosphoric acid was used. ----- Beachfront Celebration - Latinesque by Kevin MacLeod is licensed under a Creative Commons Attribution license (ht
Article: Soldering stainless steels
2. If you can't find the menu, tap "Exit Safe Mode" text at the top center of your iPhone's status bar. 3. A hard restart of iOS with iPhone's Power button can disable Safe Mode too. It is very easy to handle all those methods to put your iPhone into DFU Mode, Recovery Mode and Safe Mode. Just have some patience.
The Power of No « Mind Hacks :: WonderHowTo
If you can't stop yourself from using the same password over and over again, but think you may have been compromised by a recent hack, you should check out Should I Change My Password? to see if
I've Been Hacked - What To Do After You've Been Hacked
Don't Miss: How to Clear the RAM to Fix Problem Apps & Boost Performance; Step 1: Access the iPhone X App Switcher Without a Home Button. To access the app switcher, you'll need swipe up from the bottom of the screen, then pause with your finger in the middle of the screen for a second until all of the app cards appear. That pause is key.
iPhone XR benchmarks: Every bit as fast as the iPhone XS
News: iOS 11.4 Beta 5 Released for iPhones with Under-the-Hood Improvements News: AR Cloud Company 6D.Ai Seeks Developers for Closed Beta of SDK News: HQ Trivia Now Available to Download on Android News: iOS 11.2.5 Beta 5 Released for iPhones with Under-the-Hood Improvements Only
iOS 8.3 beta 3 released with new features and improvements
The minimum power needed for a laser light show in a dark, medium-sized room (like a hotel ballroom) is about 500 milliwatts to 1 watt. Somewhere between 5 and 20 watts is typical for indoor use. In large arenas and outdoors, 10 to 80 watts is common.
DIY Laser Show: The best laser effect ever! - YouTube
This exploit comes after another one that we've recently found, one that lets quick-fingered thieves steal your Watch and access the Watch without needing your passcode. This lets them use Apple Pay to make purchases at nearby stores before you have a chance to remove the device from your Apple Pay settings in iCloud.
Potentially big Apple Watch vulnerability could let thieves
Snapchat Login Guide : How to Use Snapchat on PC. While Snapchat doesn't have a desktop version, there's still a way to use Snapchat on your computer - using emulators. Emulators create a mobile-like environment in your Windows PC or Mac, and you can run mobile apps on your PC easily. So, install a good emulator on your PC and run the app.
News: So Long, Siri! The Superior Google Assistant Is Coming to iOS How To: How Thieves Unlock Passcodes on Stolen iPhones (And How to Protect Yourself Against It) How To: All Side Button Tips & Tricks You Should Be Using on Your iPhone X S, X S Max, or X R
How to Use the Cortana Voice Assistant in Windows 10
How To Copy And Paste On An iPhone. Before you can copy anything on an iPhone, first you need to select it. In other words, you need to tell your iPhone, "This is the text I want to copy." Some people say highlighting text instead of selecting, but since select is the "proper" term, that's what we'll use in this article.
How to Cut, Copy, and Paste on Your iPhone 4S - dummies
0 comments:
Post a Comment